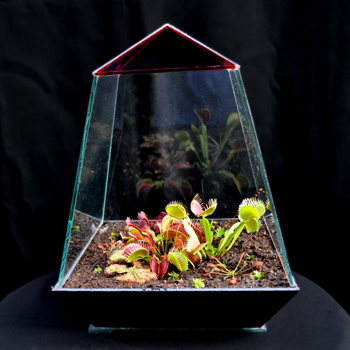
Carnivorous Plant Terrarium: Obelisk
Carnivorous Plant Terrarium: Obelisk


1. Materials: Included in the kit are all the materials you will need to build the terrarium. This includes: all glass pieces (cut to size), glass sealer, tape, pins, razor blade and graph paper. Organize the pieces and note the door piece is shorter and is not glued into the terrarium, but rests in place when finished. Read all instructions before beginning.
2. Applying sealer: The glass sealer provided is aquarium safe and not toxic to carnivorous plants. Apply an even bead of sealant to each edge that is to be glued together. It is a good idea to have some paper towel around to clean up any excess sealant. Follow the application directions printed on the sealant tube.


3. Assemble sides: Use tape to hold all four sides in place. The three sides of equal dimensions are glued together, but the door is not glued to the other sides. Align bottom edges on graph paper to assure the shape is square when dry. Keep sides straight and aligned. Apply sealant to edges of sides. Inside corners may be glued later.
4. Assemble top: Tape may be used to hold top pieces together. Align the pieces on the graph paper to insure a square shape when dried. Tape may be removed once glue is dry (usually 24 hours). Note that sealant need not be applied to the outer side of the top of the terrarium. It is easier to clean the inner surface of the top before attaching to sides.


5. Assemble bottom tray: The bottom is assembled the same as the top and sides. Once it is dry, center it on to the bottom piece of glass. Use sealant to attach the bottom and fill in the narrow gap between the bottom plate and the bottom dish. Be sure it is square and totally dry before attaching other sections.
6. Square up pieces: Be sure to use the graph paper to insure the assembled top, sides and bottom are square. This is especially helpful when the top, sides and bottom are finally glued together. Before assembling sections together consider cleaning up any excess sealant on each of the sections, especially in the inside areas.
7. Protecting inner glass: Tape may be used on the inner surfaces to outline the joint that is to be sealed. The tape will keep the sealant from getting on the inner surfaces and make a neater looking terrarium.


8. The tape may be removed when the sealant is dry. A razor blade or steel wool may be used to remove excess sealant.
9. Assemble the three sections: Start by positioning the center section onto the bottom tray. Use tape to hold it into place. Glue the joining edges with sealant. Consider filling in the narrow gap between the sides and bottom tray. Use tape to hold sections together. Attach the top after the side section has dried.
10. Finished terrarium: Let the sealant dry for 24 hours. Remove all tape and use the razor blade or very fine steel wool to clean up joints and remove any excess sealant. Check the bottom tray for leaks. The door should fit loosely in place, and may be secured with clear tape. Some models come with stained glass pieces.
Download a .pdf copy of the Plans to Build an Obelisk Carnivorous Plant Terrarium.
Download a .pdf copy of the Plans to Build a Dodecahedron Carnivorous Plant Terrarium.

